Keychain cameras are all the rage these days. After the success of the Kodak Charmera, it is of little surprise that other companies are getting in on the fun. What sets the new Keymera apart, though, is that it's 3D-printable and can be built by photographers at home.
College sophomore Ian Vanveen, 20, got into woodworking as a way of budget management. “I didn’t have a whole lot of money,” he says, “so I decided to build what I wanted myself.” The mostly self-taught craftsman started off making furniture, but was eventually itching to do more.
So Vanveen took a carpentry class to learn about different woods and their properties. There, he discovered things like how different kinds of wood can vary in density, and how wood’s fibers can expand or shrink depending on humidity. He then decided to combine his newfound knowledge with his building skills and start making electric guitars.
“That’s when things got interesting,” he says.
A high schooler makes his first electric guitar, kind of
The first electric guitar that Vanveen handled was his dad’s old band guitar: a blue, semi-hollow body, Gibson ES-355. A high schooler at the time, Vanveen immediately felt a connection with the instrument, and got it in his brain to make his own custom-made six-string.
Ian Vanveen first got the itch to make a guitar after handling his dad’s blue, semi-hollow body, Gibson ES-355. Image: Ian Vanveen
So he set up shop in his family’s Wisconsin garage, and got to work building. He took a bunch of pine two-by-fours left over from a home deck project, “and just cut it up and glued all the pieces together,” he says. “It turned out really bad.”
A second attempt at a DIY guitar
Vanveen took a couple years off before he started crafting a second guitar, though this time he went in with a bit more planning and forethought. While a fan of the iconic Les Paul guitar shape—which is slightly asymmetrical with a rounded top and larger, rounded bottom—the student found it “notoriously thick, and really uncomfortable.”
He decided instead to create the thinnest guitar possible without having it warp over time (slimmer guitars are more susceptible to changes in humidity, temperatures, and high-string tension). Another non-negotiable: Vanveen wanted the instrument to sound loud when he played it even when it wasn’t plugged into an amp. “I was really adamant about this.”
His first step was sketching a model of the instrument using Adobe Illustrator. “I didn’t have any of the dimensions, really,” says Vanveen. “I just figured that out as I went.”
For this project he used maple, a stiff and dense wood that’s known for its stability. He then took a couple of weeks to test its strength and see how thin he could get it while still withstanding maximum string tension. “I got it down to an inch and an eighth,” he says. “If I went any lower than that, the whole body would bend over time.”
Vanveen made his first guitar in high school. “It turned out really bad,” he says. Image: Ian Vanveen
Vanveen used a miter saw—good for making quick and angled crosscuts—to cut individual wood boards, creating what would become the guitar’s rough shape. He then used a jigsaw power tool for hollowing out the piece and contouring, and a drill to make holes for the electronics. These include adjustable potentiometers (“pots”), which are basically electrical components that allow a musician to control the instrument’s volume and tone, and a capacitor to filter its frequency (the speed at which its strings vibrate) and shape its tone.
Since Vanveen wanted his guitar to sound loud even without plugging it in, he hollowed out the entire instrument (other than its center, where its wiring is now located) using a handheld router.
“The idea was that the sound would reflect a little bit more within the holes,” he says. As with standard acoustic guitars, the hollow chamber allows the guitar’s wood to vibrate and air to move around inside more freely. This in turn amplifies the sound.
When it came to wiring, Vanveen bought the “cheapest stuff” he could find off of eBay for about $15. The pre-assembled kit contained both potentiometers and a capacitor. It also came with a selector switch to choose guitar pickups, which are electromagnetic transducers arranged in various configurations to determine the “color” of a sound. For example, one pickup might produce a tone that’s “bright and crisp,” while another could be described as sounding “warm and gritty.” It also included all the necessary wires for the electric instrument.
The guitar features a black-and-white color scheme, which Vanveen says was inspired by a photography class he was taking at the time. It’s also specially crafted for left-handed people. “They don’t really make left-handed electric guitars,” he says, “and I’m left-handed. So this was a big moment for me.”
Vanveen plans to make more improvements to his handmade guitar. Image: Ian Vanveen
The finished product
Overall, the piece took Vanveen about five months to make. This involved two months of planning and three months of cutting, crafting, wiring, sanding, painting, and assembling. He typically put in more than 20 hours a week, working mostly on weekends. All said, Vanveen worked more than 200 hours to put the guitar together.
Although Vanveen hasn’t made any new guitars since he started college in fall 2024, he’s still looking for ways to improve his 2.0 version.
Earlier this year, he learned to use an operational amplifier (op-amp), which allows him to further manipulate and control the instrument’s tone. He’s also created a digital circuit simulator that can bypass the guitar’s capacitor, aka its frequency filter, and utilize other capacitors connected to ground.
“Most guitars have only one capacitor,” limiting the instrument’s ability to shape tones, says Vanveen. Instead, his simulator connects a variety of outside capacitors to the guitar’s potentiometers, or volume controls. Vanveen can then get a whole different tone depending on which one he chooses.
“This summer I’m gonna build a new guitar with these switches,” says Vanveen. But it has to wait until he’s home from college. “I make everything in my parents’ garage.”
In The Workshop, Popular Science highlights the ingenious, delightful, and often surprising projects people build in their spare time. If you or someone you know is working on a hobbyist project that fits the bill, we’d love to hear about it—fill out this form to tell us more.
Your Google account likely stores a lot of important information, from your home address in Google Maps and your work emails in Gmail, to family pictures in Google Photos and personal conversations in Google Chat. You don’t want anyone else gaining access to that data—and nor does Google.
To minimize the chances of anyone else accessing your account, Google has created a Security Checkup tool that you can use in any web browser. It takes you quickly and simply through a security audit, warning you about potential issues without overloading you with settings and menu screens.
If you’re logged into Google in your web browser, you can get to the Security Checkup tool from this page. Alternatively, you can find it from your Google account page, by clicking Security and sign-in (the Checkup should appear at the top).
Devices and sign-ins
Any causes for concern will be flagged for you to review. Screenshot: Google
The Security Checkup will alert you to pressing problems that have been identified, but you can work through each section in turn, whether or not there are related issues. To start, you can see the devices that you’re currently signed into Google on under Your devices. It will also list their location, operating system, and when you last used them.
If there’s anything you don’t recognize here, or there’s a device you no longer have, you can disconnect it from your account remotely. It’s best to err on the side of caution here—if you accidentally disconnect a device that is actually genuine and that you are still using, the worst that’s going to happen is you’ll need to sign in again on that device.
Then we’ve got the Sign-in and recovery section. This contains crucial information about how your account is accessed, so make sure everything here is in order, and up to date. For example, you might be asked to confirm your backup email address and phone number, which will be crucial (and trusted) communication channels for Google to use should you somehow get signed out of your account.
Many devices now use passkeys, where you use something like a PIN code or a fingerprint scan to access your accounts. You can also see a list of passkeys you’ve set up here—and again, as with the list of devices, passkeys can be revoked if you see something that might be a problem (such as an authorization you don’t recognize).
Then you have the Your saved passwords section. If you’re using Android and Google Chrome to save login credentials to your Google account, then the stored passwords will appear here. Google will warn you if any passwords have been repeated or aren’t strong enough (usually because they’re not long or complex enough).
Browsing and activity
Review the apps and services that are connected to your Google account. Screenshot: Google
The Safe Browsing section of the Security Checkup is specifically for users of the Chrome browser, and gives you extra, proactive protection against dangerous websites and extensions. However, it also requires a greater level of data sharing with Google (so it can check your activity), and can feel restrictive for those who feel confident recognizing threats themselves—so the choice is yours.
Open Recent security activity, and you see a detailed list of all security-related activity on your Google account across the last 28 days. This will include activity such as devices you’ve signed in on, or deleted data you’ve recovered (something a hacker could potentially attempt to do). If anything here looks suspicious, you can alert Google.
Under Your third-party connections, you can see apps, sites, and services that have some kind of connection to Google. Maybe you use your Google credentials to log into them, for example, or they’re utilities that you use to manage your Google Photos account. Google-made smart home devices may also appear here.
The rules are the same as they are with connected devices: If you see anything that shouldn’t be there, you can break the link. The app or site in question will no longer have access to your Google account and its data. If you need to use it again, you’ll need to reapprove the connection. It’s a good idea to regularly review this list, to make sure older services that you no longer regularly use have been removed.
The final part of the Google Security Checkup is Gmail Settings, and from here you can view and make changes to email accounts you’ve blocked, and email accounts you’ve connected to. If you see anything that’s not right, you’re able to make changes. And with that done, your security checkup is complete—and your Google account should be significantly more secure than it was before.
Bamboo may feel like an easy landscaping win because it’s a fast-growing privacy screen that can turn a plain yard into a lush retreat. But then a few shoots start popping up in random places all over your yard. Before long, they’re pushing through flower beds, lawns, and even neighboring yards. What looked like a landscaping dream can quickly become a problem.
Stories of runaway bamboo have gone viral online, with some homeowners spending thousands trying to remove it. So, is all bamboo invasive? Not exactly. Some species grow in slow, manageable clumps, while others spread aggressively underground through fast-growing stems. The key is to identify what kind of bamboo you’re dealing with and act before it takes over.
How to Identify the Type of Bamboo Growing in Your Yard
Not all bamboo behaves the same way. There are two main categories: running and clumping. Both are members of the grass family Poaceae, but unlike the soft turf grasses in your lawn, bamboo grows thick, woody stalks called culms. Species range from small, groundcover-like plants to towering varieties that reach nearly 100 feet in height.
Bamboo stalks are thick beasts. Image: Shutterstock DISGO99
Running bamboo
There are many species of running bamboo, but they all behave in a similar way: they spread aggressively underground through fast-moving rhizomes. The species that causes the most trouble for homeowners in the U.S., especially across the Southeast, is Phyllostachys aurea, better known as golden bamboo. It’s considered one of the most invasive bamboo species in North America.
Running bamboo rhizomes can travel surprisingly far from the original plant before sprouting new shoots. Those rhizomes store energy for the plant, which is why simply cutting down visible stalks rarely solves the problem. Left unmanaged, running bamboo can rapidly colonize your entire yard and neighborhood.
Clumping bamboo
There are also several species of clumping bamboo, though they tend to behave much differently from running varieties. One popular example is Fargesia robusta, which is often grown for its cold hardiness and more manageable growth habit. No matter the species, clumping bamboo generally grows slowly outward in tight clusters rather than spreading long distances underground.
That makes clumping bamboo easier to control and far less likely to become a neighborhood-wide problem. While it still spreads through rhizomes, the underground stems remain compact and close to the parent plant rather than racing across a yard.
Get Expert Advice
If you can not tell by visual cues alone, no worries. Take photos of shoots, leaves, and stalks, and contact your local county extension offices to help identify the species. Extension experts can often confirm the type. Although you can try using plant ID apps, keep in mind they aren’t always accurate; they can still be useful starting points.
A bamboo shoot emerges from dirt. Should you panic? Not yet. Image: Getty Images Meta
Why Bamboo is so Difficult to Remove
What makes bamboo so frustrating to eliminate is its massive underground network of rhizomes, which fuels its growth. These root-like stems spread beneath the soil in multiple directions, storing energy and sending up new shoots far away from the original plant. In running bamboo species, that underground web can quietly expand for months before homeowners realize how far it has traveled.
What about just mowing it regularly or cutting it down? That may temporarily weaken the plant, but it can also trigger fresh shoots as the rhizomes tap into their stored energy reserves. That solution only works on the surface. Even small fragments left behind in the soil can regrow into entirely new plants.
In warmer regions like the Southeast United States, invasive bamboo has become such a persistent issue that some municipalities now regulate where it can be planted. Fully removing established bamboo often requires repeated digging, cutting, or chemical treatment over months or even years.
How to Remove Bamboo
If bamboo has started spreading through your yard, the good news is that you probably do not need heavy machinery immediately. The bad news is that waiting too long can turn a manageable project into a years-long battle. The right removal method depends on how large the infestation is, how long it has been growing, and how much labor you are willing to take on.
Method 1: Manual removal
This method works best for small or early infestations. The goal is to dig out as much of the underground rhizome network as possible by cutting down visible stalks and removing the thick stems beneath the soil.
The biggest advantage is that it does not require herbicides and can permanently eliminate smaller patches if done thoroughly. The downside is that it is extremely labor-intensive, and even small rhizome fragments left behind can resprout later. Because of that, manual removal requires ongoing monitoring. Homeowners need to check the area for months and quickly remove any new shoots before the bamboo has a chance to recover and spread again.
Method 2: Cutting and starving the plant
This method is best for long-term control and ongoing maintenance rather than quick removal. It works by repeatedly cutting down new shoots before they can grow leaves. Without leaves, the bamboo cannot photosynthesize efficiently, which slowly drains the energy stored in the underground rhizomes. The advantage is that it avoids herbicides and can weaken even large patches over time. The downside is that progress is slow and often requires multiple growing seasons. If you miss even a few cutting cycles, the bamboo can recover and continue spreading.
Method 3: Herbicide treatment
This method is best for large, established patches that have spread beyond easy digging. Glyphosate-based herbicides are commonly used because the plant can carry the chemical from actively growing leaves down into the underground rhizome system. The advantage is that herbicides can help weaken dense infestations that would be difficult to remove by hand alone. The downside is that complete removal usually requires repeated applications rather than a single treatment.
Chemical control also comes with tradeoffs. It is important to follow local regulations, avoid spraying near waterways, and consider the potential ecological impact before using herbicides as part of a removal strategy.
Method 4: Professional removal
This method is best for severe infestations, especially when established bamboo has spread beneath fences, patios, driveways, or neighboring properties. Professionals may use excavation equipment to remove large underground rhizome networks and install root barriers to help prevent the bamboo from returning. The biggest advantage is that it can fully address infestations that are too extensive for most homeowners to manage on their own. The downside is cost, as professional removal can quickly become expensive, particularly when excavation or property repairs are involved.
You never want to see a ‘storage full’ message pop up on your phone. It means you’re not going to be able to install new apps, or capture new photos, videos, or audio messages, because there’s nowhere to put them. You won’t be able to sync music or podcasts, if the storage is all filled up.
The good news is, you can preemptively prevent this from happening by doing a little bit of regular digital housekeeping. Android and iOS now come with features to make it easier for you to manage local storage, whether it’s deleting files completely or sending them off to the cloud for safe keeping.
These are your options for keeping a sizable chunk of space available on your phone for when you need it.
How to free up space on Android
Android comes with a Google app called FIles, and if you load this up you can begin diving in and deleting files manually. The Downloads folder is a good starting point: It’s likely there are quite a few files here that you’ve downloaded from the web and forgotten about, and that you don’t need any more.
Tap the three dots to the right of a file then Move to trash to delete it (it will stay in the Trash folder for 30 days before being completely wiped). To delete several files at once, tap one of the check boxes on the right to start selecting, then tap the trashcan icon at the top to confirm your choice.
The Android Files app shows you how much room you’ve got left. Screenshot: Android
The Files app comes with a dedicated tool for freeing up storage. From the front screen, tap the menu icon (three horizontal lines, top left), then select Clean. You’ll be shown a breakdown of how much room is left on your phone, together with ways to increase it. These might include deleting duplicate files and screenshots, but the options you see will vary depending on your device.
For example, you might see an option to Delete memes—images detected as standard meme templates that your contacts have sent to you over messaging apps. Pick Select files, and you can choose which memes to delete before sending them to the Trash folder.
You might also be advised to delete certain apps via the Files app, but you can also do this yourself from the Settings page in Android by choosing Apps, then selecting an app, and tapping Uninstall. Under Storage and cache you can see the space each app takes up, which can help you figure out what to get rid of (remember these apps can always be reinstalled, if needed).
In Google Photos, you can delete local copies. Screenshot: Google
Speaking of apps, it’s worth double-checking any offline content you might have cached in your media apps. In Spotify, for example, tap your profile picture (top left), then Settings and privacy > Data-saving and offline to see how much room is being taken up by the app, and to get to the Remove all downloads option.
Finally, there’s a separate option in Google Photos for Android. If you tap your profile picture (top right), then Free up space on this device, you’ll be able to delete local copies of photos and videos that have been safely backed up to the cloud. Bear in mind though that you should always keep another backup somewhere else, in case anything should happen to your files in the cloud.
How to free up space on iOS
Over on the iPhone, there is a tool for identifying ways you can free up more storage space, but it’s not in the native Files app for iOS. Instead, you need to go to Settings, then tap General > iPhone Storage. You’ll see how much storage space is spare, and some suggestions for what you can do about it.
Scroll down and you get a full list of the apps installed on your phone, with the biggest ones at the top—it might be worth removing any you don’t use regularly. Tap on an app name and there are two options: Offload App (which keeps the app in place but deletes all the data it has stored locally), and Delete App (which removes it completely).
The iPhone Storage screen in iOS Settings. Screenshot: Apple
You can also uninstall apps from the App Library screen to free up space: Tap and hold on an app icon, then pick Delete App. Bear in mind you can always reinstall these apps again later, or even use the web app versions through Safari, if you find you need them again.
Photos and videos can take up a good chunk of space on a phone. If you open iOS Settings and pick Apps > Photos, you’ll find an Optimize iPhone Storage option, if you’re syncing to iCloud—this means lower-resolution versions of your files will be saved locally, as long as they’re safely backed up to the cloud.
Google Photos for iOS offers something similar, if that’s your photo and video app of choice. Inside the app, tap your profile picture, then choose Free up space on this device and you get the option to delete local copies of photos and videos that are saved in the cloud. With any of these clean-up tools though, remember that cloud copies are not enough on their own—you do need to make sure these files are saved somewhere else as well (like on a laptop), just in case.
You can optimize photo and video storage on the iPhone. Screenshot: Apple
It’s worth digging through media apps that may have saved content for watching or listening too offline as well (the iPhone Storage screen will tip you off to some of these). To check downloaded content in the Netflix app, for example, open the My Netflix tab and then choose Downloads.
Finally, you can use the iOS Files app for manual deletions as well. From the Browse screen, tap On My iPhone: Long press on a file to find the Delete option, or tap the three dots (top right) and Select to pick multiple files (a trash can icon will show up at the bottom). The files get moved to the Recently Deleted folder for 30 days, and after that they’ll be wiped permanently.
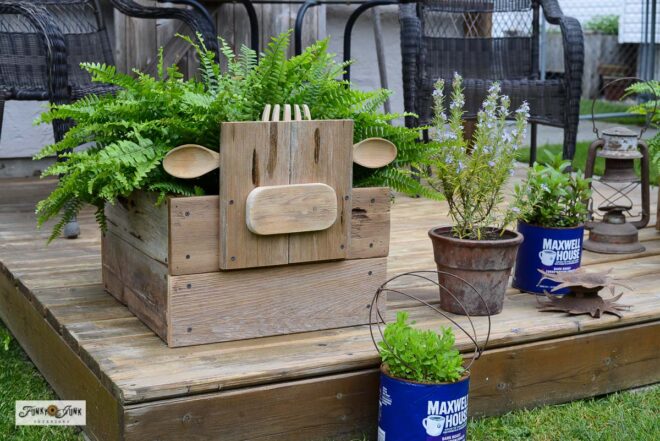
Bring a touch of farmhouse charm to your garden by building this cow-themed simple DIY planter box, featuring adorable wooden spoon ears and salad fork hair for a playful, rustic look! As a Fusion and Amazon Influencer, this post contains affiliate links in which I earn a small percentage from qualifying purchases at no extra […]


 Bring a touch of farmhouse charm to your garden by building this cow-themed simple DIY planter box, featuring adorable wooden spoon ears and salad fork hair for a playful, rustic look! As a Fusion and Amazon Influencer, this post contains affiliate links in which I earn a small percentage from qualifying purchases at no extra […]