Reading view

This Sheet Pan Balsamic Salmon Is the Simple Dinner That Always Delivers

Here’s the thing about sheet pan dinners: the best ones have a moment when I look at the pan and think: This is so much better than I expected. The whole point of this kind of meal is that the end result should feel like more than the sum of its parts—and that’s certainly the case with this peak summer balsamic salmon.

Why This Balsamic Salmon Always Works

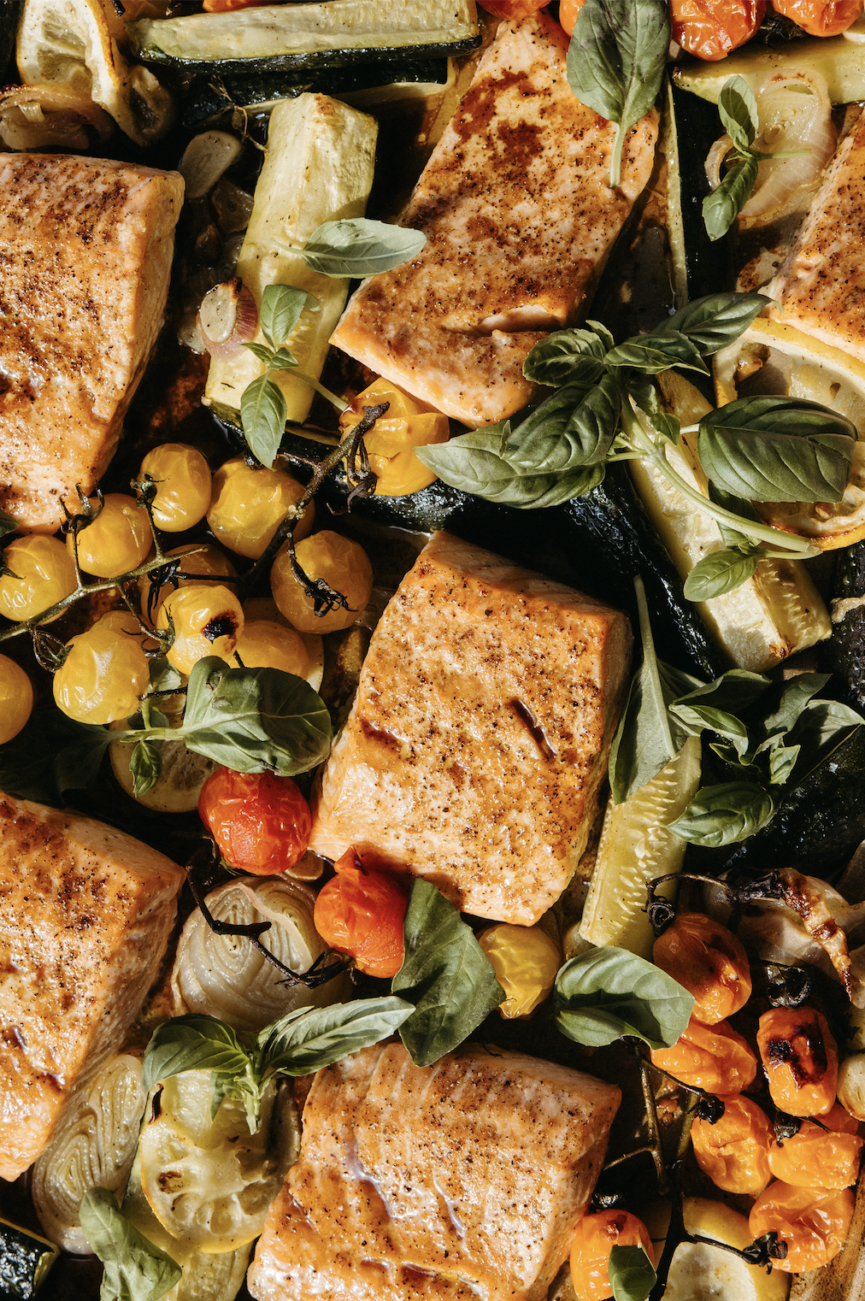
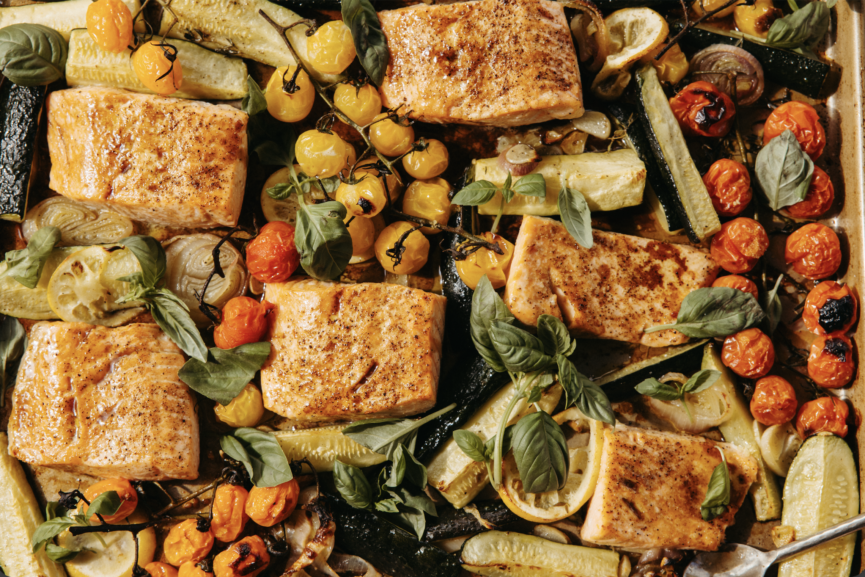
Here’s how this one goes down: you roast the cherry tomatoes, zucchini, garlic, and shallots first—about 15 minutes at 400 degrees—just until everything softens and the tomatoes start to split and get jammy at the edges. Then you crank the broiler, nestle the salmon right into the vegetables, and finish the whole pan under high heat. A couple minutes in, brush the salmon with a quick mix of balsamic vinegar and honey, let it caramelize under the broiler for a few more minutes, and that’s it. The glaze lacquers everything so it’s sweet-tangy and slightly sticky at the edges—and the smell when you open the oven will bring everyone into the kitchen, asking when dinner’s going to be ready.

This is one I keep in constant rotation, not only because it’s delish, but also because it’s a fast dinner (30 minutes, meaning I can make it at the end of a busy day without feeling stressed). Plus, I love that it all happens in one pan, and somehow still feels like the kind of dinner you’d order at a restaurant (with hardly any more clean-up, even though you made it all at home).

The Veggies That Make This Salmon Taste Like Summer

The vegetables are what make this summery and infuse the dish with tons of flavor. Regular or baby zucchini—if you can find them at the farmer’s market, grab them—are halved lengthwise so the cut side caramelizes against the pan, and the cherry tomatoes burst and essentially become their own little sauce pooling around the salmon. Garlic and shallot roast until they’re soft and sweet, almost jammy themselves, then get brightened up with lemon and fresh thyme.

The 2-Ingredient Balsamic Glaze

The glaze is just two ingredients: 3 parts balsamic to 1 part honey. Just mix it in a small bowl while the vegetables are in their first round in the oven. The result tastes so much more complex—the balsamic gives that punch of acidity, rounded out by the honey, and under the broiler, it thickens and becomes a glaze for the salmon.

Pin it

How to Use Your Broiler (Without Overdoing It)

A broiler lesson that I’ve learned the hard way (too many times to count): it works fast. Three minutes before the glaze, then two or three more to finish. Direct heat from above is what caramelizes the glaze and gives you that golden-brown crust, and the salmon stays tender because it’s only under high heat for a few minutes total. You want the salmon just cooked through, still a little translucent in the very center if that’s your preference.

Pin it

The Finishing Touches That Bring It All Together

When your balsamic salmon comes out of the oven, I highly recommend squeezing some of those roasted lemon wheels over everything, then showering it all with fresh basil to cut through the richness. It also makes the whole pan look incredibly gorgeous if you’re serving family-style at the table.

This is the kind of dinner I want to eat all summer. It’s light enough for a patio meal in the sunshine, and satisfying enough that nobody’s rummaging through the pantry an hour later—a Mediterranean diet recipe that feels indulgent.

If you’re looking for an easy salmon recipe that earns its keep in the weeknight rotation, this is the one. Find the full recipe below, and let me know in the comments if you give this one a try!

Print

Sheet Pan Balsamic Salmon with Cherry Tomatoes & Zucchini


  • Author: Camille Styles
  • Total Time: 30 minutes
  • Yield: 4

Description

A 30-minute sheet pan dinner that is so much more than the sum of its parts. The honey-balsamic glaze makes the salmon and veggies sticky-sweet and caramelized.


Ingredients

  • 4 5-ounce salmon filets (halved if you want them more well-done)
  • 1 pint cherry tomatoes
  • 5 cloves garlic
  • 1 shallot
  • 1 lemon
  • A few sprigs thyme
  • Extra-virgin olive oil
  • Kosher salt & freshly ground pepper to taste
  • 3 tablespoons balsamic vinegar
  • 1 tablespoon honey
  • Basil leaves for garnish

Instructions

  1. Preheat the oven to 400 degrees. Cut each zucchini lengthwise into 4 pieces, then halve crosswise. (if using baby zucchini, just halve each one lengthwise.)
  2. Peel and roughly chop the garlic, then peel and slice shallot into rings. Slice lemon into thin wheels.
  3. In a medium bowl, combine zucchini, cherry tomatoes, garlic, shallot, lemon, and thyme. Drizzle with about ¼ cup olive oil, then season generously with salt and pepper. Toss to combine, and pour onto foil-lined baking sheet.
  4. Bake 15 minutes, then remove from oven and crank up the broiler.
  5. Combine the balsamic and honey in a small bowl.
  6. Nestle the salmon filets into the veggies, then drizzle with olive oil and season well with salt and pepper.
  7. Broil for 3 minutes, then brush with balsamic/honey mixture and pour additional over and around the veggies. Broil for 2-3 more minutes, until salmon is done to your liking.
  8. Remove from oven, and garnish with fresh basil. Eat and enjoy!
  • Prep Time: 10
  • Cook Time: 20
  • Category: sheet pan dinner

Keywords: balsamic salmon

Did you make this recipe?

Share a photo and tag @camillestyles — we can’t wait to see what you’ve made!

The post This Sheet Pan Balsamic Salmon Is the Simple Dinner That Always Delivers appeared first on Camille Styles.

  •  

Sweet Potato and Roasted Chickpea Bowl

Plant-based proteins make for a simple but hearty meal loaded with fiber and heart-healthy polyunsaturated fats (1). Sweet potatoes serve as a comforting base for this flavor-packed bowl, laced with rosemary and tangy balsamic vinegar. Roasting chickpeas makes them crunchy and irresistible — the perfect topper for a colorful bowl of goodness.

Active time: 20 minutes | Total time: 35 minutes

Sweet Potato and Roasted Chickpea Bowl

Ingredients

  • 1 15-oz. can low sodium chickpeas, drained and rinsed
  • 3 tbsp olive oil, divided
  • 1 tbsp fresh rosemary, chopped, divided
  • 2 tbsp balsamic vinegar
  • 1 clove garlic, pressed
  • 1/2 tsp salt
  • 4 cups cubed sweet potato, from about 2 medium potatoes
  • 4 cups chopped kale
  • 1/4 cup toasted walnuts, coarsely chopped

Directions

Preheat the oven to 400°F (205°C). Place the drained chickpeas on a kitchen towel and fold the towel over to enclose them. Rub gently to loosen the skins, then discard the skins. Transfer the chickpeas to a sheet pan.

Drizzle 1 tbsp olive oil over the chickpeas, add 2 tsp of the chopped rosemary, and toss to coat. Roast for 25–30 minutes, or until the chickpeas are crisp. Remove from the oven and let cool slightly.

In a small bowl, whisk together the remaining olive oil, balsamic vinegar, remaining 1 tsp rosemary, garlic, and salt to make the dressing.

Cube the sweet potatoes and place them in a steamer basket set over simmering water. Steam for about 5 minutes, or until tender when pierced with a paring knife. 

Meanwhile, place the chopped kale in a large bowl and pour the dressing over it. Massage the kale with your hands for about 1–2 minutes, until slightly softened and well coated. Divide the dressed kale evenly among 4 bowls, then top each bowl with sweet potatoes.

Top each bowl with one-quarter of the roasted chickpeas and sprinkle with the chopped walnuts. Serve immediately.

Serves: 4 | Serving Size: About 2 1/2 cups per serving

Nutrition (per serving): Calories: 371; Total Fat: 17g; Saturated Fat: 2g; Monounsaturated Fat: 8g; Polyunsaturated Fat: 5g; Cholesterol: 0mg; Sodium: 493mg; Carbohydrate: 48g; Dietary Fiber: 12g; Sugar: 8g; Protein: 10g

Nutrition Bonus: Calcium: 15%; Iron: 18%; Potassium: 723mg; Vitamin A: 377%; Vitamin C: 45%

Originally published August 25, 2018; Updated March 2026

The post Sweet Potato and Roasted Chickpea Bowl appeared first on MyFitnessPal Blog.

  •  

Slow Cooker Chicken Chile Verde

Slow-Cooker Chicken Chile Verde

This easy, flavor-packed dinner can be assembled in the morning in your slow cooker so you have dinner waiting for you when you get home. The tomatillos cook down into a tangy stew that gets a kick of heat from jalapeño and canned green chilies, while the boneless skinless chicken thighs become tender and practically fall apart when you shred them. Serve the chili verde over a bed of steamed rice with your favorite toppings, or with warm tortillas for dipping. We like to top it with a dollop of Greek yogurt for added creaminess.

RD Tip

This is a recipe you can mold to your nutritional needs. You can alter the nutrition by intentionally choosing toppings — add avocados and Greek yogurt if you want to bump up the calories, or radishes if you want extra flavor and crunch without adding many calories. You can also add a can of white beans for extra protein and fiber (1).

Active time: 25 minutes | Total time: 4–6 hours, 25 minutes

Slow Cooker Chicken Chile Verde

Ingredients

  • 2 tbsp olive oil
  • 1 1/2 lb (680g) tomatillos, husks removed and halved or quartered, if large
  • 1 small yellow onion, finely diced
  • 5 garlic cloves, smashed
  • 1 jalapeño, seeded and minced
  • 1/4 cup cilantro leaves, finely chopped
  • 1 4-oz. can chopped green chiles
  • 1 tsp cumin seeds
  • 1/2 tsp salt
  • 1/2 tsp black pepper
  • 1 1/2 lb (680g) boneless, skinless chicken thighs
  • 2 tbsp fresh lime juice, plus more as needed

Directions

In the insert of a 5–7-quart slow cooker, heat the oil on the sauté setting until shimmering. If your slow cooker does not have a sauté setting, heat the oil in a large nonstick skillet over moderately high heat, then transfer the contents to the slow cooker before proceeding.

Add the tomatillos and cook, stirring occasionally, for 8–10 minutes, until they begin to brown and soften. Add the onion, garlic, jalapeño, cilantro, green chiles, cumin seeds, and ½ cup water and stir to combine. 

Season the chicken thighs all over with salt and pepper and nestle them into the tomatillo mixture. Cover and cook on high for 2-3 hours or on low for 4-6 hours, until the chicken is very tender and pulls apart easily.

Transfer the chicken to a cutting board and let rest for 10 minutes. Using two forks, shred the meat into bite-size pieces. 

Meanwhile, use the back of a large spoon or an immersion blender to mash or partially blend the tomatillos to your desired consistency. Stir the shredded chicken back into the sauce along with the lime juice and season with additional salt, pepper, and lime juice as needed.

Serve with your desired toppings and sides.

Serves: 6 | Serving Size: 1 1/2 cups

Nutrition (per serving): Calories: 234; Total Fat: 11g; Saturated Fat: 2g; Monounsaturated Fat: 5g; Polyunsaturated Fat: 2g; Cholesterol: 107mg; Sodium: 379mg; Carbohydrate: 11g; Dietary Fiber: 3g; Sugar: 6g; Protein: 24g

Nutrition Bonus: Calcium: 3%; Iron: 11%; Potassium: 690mg; Vitamin A: 5%; Vitamin C: 33%

Originally published: February 5, 2021; Updated May 2026

The post Slow Cooker Chicken Chile Verde appeared first on MyFitnessPal Blog.

  •  

Pressure Cooker Ginger Chicken and Eggplant

Two bowls of quinoa salad are placed on a white surface. Each bowl contains chunks of instant pot chicken, roasted eggplant slices, fresh basil leaves, and cooked quinoa. A fork and knife are positioned nearby, along with a glass of water. MyFitnessPal Blog

The Instant Pot renders chicken thighs fall apart-tender and slender Japanese eggplant deliciously custard-like in just 12 minutes under high pressure. As an added bonus, quinoa, which is a complete protein, can be cooked at the same time using the “pot-in-pot” method (1). You’ll need a tall trivet and 6-cup (1.4L) baking dish that fits inside the pot to cook the quinoa above the chicken mixture.

Active time: 10 minutes | Total time: 40 minutes

Pressure Cooker Ginger Chicken and Eggplant

Ingredients

  • 1 lb (454g) boneless, skinless chicken thighs, meat cut into 1/2-inch (1.3cm) strips
  • 1/2 tsp salt
  • 1 tbsp olive oil
  • 1 tbsp ginger, minced
  • 3 cloves of garlic, minced
  • 1/4 cup (60ml) low sodium chicken broth
  • 3 tbsp low-sodium soy sauce
  • 1 tsp sambal oelek
  • 1 large Japanese eggplant, cut crosswise into large (2-inch/5cm) lengths
  • 3/4 cup (128g) dry quinoa, rinsed and drained
  • 1 tbsp cornstarch
  • 1/2 cup (12g) basil leaves, torn

Directions

Select the sauté function on the electric pressure cooker and adjust to high heat. Season the chicken all over with salt. Add the olive oil to the pressure cooker and, when hot, add the chicken. Cook, stirring frequently, for about 5 minutes, or until browned. Add the ginger and garlic and cook for 20 seconds, or until fragrant. Press cancel.

Add the chicken broth, soy sauce, and sambal oelek, scraping up any browned bits from the bottom of the pot. Arrange the eggplant on top of the chicken without stirring.

Place a tall trivet over the chicken and eggplant mixture. In a heatproof baking dish or bowl, combine the quinoa with 3/4 cup plus 1 tbsp water. Cover tightly with foil and place on the trivet.

Lock the lid, set the valve to sealing, and cook on high pressure for 12 minutes. Quick-release the pressure and remove the lid. Carefully remove the baking dish and trivet. Discard the foil and fluff the quinoa with a fork.

In a small bowl, whisk together the cornstarch with 1 tbsp cold water. Select sauté and adjust to medium heat. Stir the cornstarch mixture into the pot and simmer for about 1 minute, stirring gently, until the sauce thickens. Top with basil and serve with the quinoa.

Serves: 4 | Serving Size: 1 cup (227g) chicken-eggplant mixture and 1/2 cup quinoa

Nutrition (per serving): Calories: 334; Total Fat: 10g; Saturated Fat: 2g; Monounsaturated Fat: 5g; Polyunsaturated Fat: 3g; Cholesterol: 106mg; Sodium: 854mg; Carbohydrate: 30g; Dietary Fiber: 5g; Sugar: 2g; Protein: 29g

Nutrition Bonus: Calcium: 5%; Iron: 16%; Potassium: 713mg; Vitamin A: 3%; Vitamin C: 6%

Originally published: November 7, 2019; Updated May 2026

The post Pressure Cooker Ginger Chicken and Eggplant appeared first on MyFitnessPal Blog.

  •  

Mushroom and Chestnut Savory Strudel

A sliced puff pastry roll filled with a savory mixture of mushrooms, spinach, and cheese is displayed on a dark baking tray. Crumbs and small pieces of the pastry are scattered around, with a fork and knife placed nearby. MyFitnessPal Blog

This showstopper vegetarian entrée is a savory spin on apple strudel, with sautéed mushrooms, chestnuts and goat cheese taking the place of fruit. The strudel can be made up to 6 hours in advance and baked right before serving, so it’s a great option for a dinner party. Serve with a baby kale salad tossed with a creamy tahini dressing for a complete meal.

Active time: 40 minutes | Total time: 1 hour

Mushroom and Chestnut Savory Strudel

Ingredients

  • 1 1/2 tbsp olive oil
  • 1 medium onion, thinly sliced
  • 1/2 lb (227g) portobello mushrooms, chopped
  • 1/2 lb (227g) shiitake mushrooms, caps sliced, stems discarded
  • 1 tbsp fresh thyme, chopped
  • 1 tsp fresh rosemary, chopped
  • 1/2 tsp salt
  • 1/2 tsp black pepper
  • 1/4 cup (59g) dry white wine or vegetable broth
  • 3/4 cup (107g) roasted chestnuts, chopped and peeled (see note)
  • 1/2 cup (70g) crumbled goat cheese
  • 12 sheets phyllo dough, defrosted if frozen
  • 4 tbsp melted ghee
  • 1/2 cup (20g) fresh dark rye or whole-wheat breadcrumbs

Directions

Preheat the oven to 400°F (204°C). Line a baking sheet with parchment paper and set aside.

Heat the olive oil in a large sauté pan or skillet over medium-high heat. Add the onion and cook for about 3 minutes, until beginning to soften. Add the mushrooms, thyme, rosemary, salt, and black pepper. Continue cooking, stirring occasionally, for about 6 minutes, until the mushrooms release their liquid and begin to brown. Add the wine and cook for 1 minute, or until evaporated. Transfer the mushroom mixture to a large bowl, stir in the chestnuts, and let cool for 10 minutes.

Place one sheet of phyllo dough on a large cutting board with the long side facing you. Brush with some of the melted ghee and sprinkle with a few teaspoons of breadcrumbs. Top with another sheet of phyllo dough, brush with more ghee, and sprinkle with more breadcrumbs. Repeat with the remaining phyllo sheets, adding breadcrumbs between layers but not on the final sheet.

Transfer the layered phyllo to the prepared baking sheet. Spoon the mushroom mixture in a line about 1 inch from the edge closest to you and sprinkle the goat cheese evenly over the filling. Fold the edge closest to you up and over the filling, then roll into a long, tight cylinder. Place seam-side down on the baking sheet and brush the exterior with any remaining ghee. The strudel may be refrigerated at this point for up to 8 hours before baking.

Bake for about 25 minutes, or until crisp and golden brown. Transfer to a serving platter and let cool for 5 minutes before slicing with a serrated knife.

Note: Peeled and roasted chestnuts are available in well-stocked supermarkets in the baking aisle. Substitute 1/2 cup roasted walnuts or hazelnuts if desired.

Serves: 6 | Serving Size: One 2-inch slice

Nutrition (per serving): Calories: 404; Total Fat: 19g; Saturated Fat: 9g; Monounsaturated Fat: 6g; Polyunsaturated Fat: 1g; Cholesterol: 33mg; Sodium: 493mg; Carbohydrate: 51g; Dietary Fiber: 3g; Sugar: 8g; Protein: 10g

Nutrition Bonus: Vitamin D: 2%; Calcium: 5%; Iron: 13%; Potassium: 354mg; Vitamin A: 1%; Vitamin C: 11%

Originally published January 12, 2019; Updated June 2026

The post Mushroom and Chestnut Savory Strudel appeared first on MyFitnessPal Blog.

  •  

Pressure Cooker Lasagna Stuffed Peppers

Instant Pot Low-Carb Lasagna Stuffed Peppers

Layers of lean ground turkey-filled sauce, creamy basil-flecked ricotta and melty mozzarella are hidden in these delicious peppers. The Instant Pot cuts the cook time to just 6 minutes, so they can be yours any weeknight when a lasagna craving hits. Be sure to use a thin bottled marinara sauce, so the Instant Pot can create enough steam to come to pressure (Note: Thick, chunky sauces won’t work).

Active time: 15 minutes | Total time: 1 hour

Pressure Cooker Lasagna Stuffed Peppers

Ingredients

  • 4 medium bell peppers
  • 1 tbsp olive oil
  • 1 lb 85% lean ground turkey
  • 1 1/2 tsp Italian seasoning
  • 1/2 tsp salt
  • 1/4 tsp black pepper
  • 3 medium garlic cloves, minced
  • 1 cup + 2 tbsp (293g) thin, no-sugar added marinara sauce, divided
  • 1 cup (246g) part-skim ricotta cheese
  • 1/2 cup (12g) fresh basil, chopped and divided
  • 1 large egg, beaten
  • 1/2 cup (57g) part-skim mozzarella, shredded
  • 1/4 cup (60g) low-sodium chicken broth

Directions

Cut the top 1/2-inch off the peppers and reserve for another use. Scoop out the seeds and white membranes inside the peppers and discard.

Put the olive oil in the Instant Pot, select saute, and adjust to high heat. When the oil is hot, add the ground turkey, Italian seasoning, salt, and black pepper. Cook, stirring occasionally, until the turkey is cooked through to an internal temperature of 165°F, about 5 minutes. Add the garlic and cook, stirring occasionally, for 1 minute. Press Cancel. Add 2/3 cup marinara sauce to the pot and stir to combine. Spoon half of the turkey-marinara sauce evenly into the peppers and set aside.

In a medium bowl, stir together the ricotta, half of the basil, and the egg until thoroughly combined.

Spoon the ricotta mixture into the peppers. Spoon the remaining meat sauce into the peppers over the ricotta, making sure to scrape the pot clean. Sprinkle the mozzarella on top of each pepper, pressing the cheese down slightly so it stays inside the peppers.

Pour the remaining 1/2 cup marinara sauce and the chicken broth into the Instant Pot, scraping up any browned bits from the bottom of the pot. Place a trivet with handles in the pot and arrange the peppers on the trivet, cheese-side up. Lock the lid and turn the pressure valve to sealing. Select Pressure Cook, adjust to high pressure, and cook for 6 minutes.

When the cooking time is up, allow the pressure to release naturally for 10 minutes, then release any remaining pressure. Carefully transfer the peppers to plates using a large slotted spoon and set aside. Remove the trivet from the pot.

Select Saute and adjust to high heat. Simmer the sauce, stirring occasionally, until slightly reduced, about 2 minutes. For browned, bubbly cheese, place the peppers under a high broiler for 2–3 minutes. Spoon the sauce over the peppers, garnish with the remaining basil, and serve.

Serves: 4 | Serving Size: 1 pepper, 3 tbsp sauce

Nutrition (per serving): Calories: 442; Total Fat: 28g; Saturated Fat: 9g; Monounsaturated Fat: 9g; Polyunsaturated Fat: 5g; Cholesterol: 169mg; Sodium: 745mg; Carbohydrate: 17g; Dietary Fiber: 4g; Sugar: 10g; Protein: 33g

Nutrition Bonus: Vitamin D: 8%; Calcium: 32%; Potassium: 864mg; Vitamin A: 11%; Vitamin C: 196%

Originally published February 2020; Updated May 2026

The post Pressure Cooker Lasagna Stuffed Peppers appeared first on MyFitnessPal Blog.

  •  

Pressure Cooker Beet and Tomato Soup

A white bowl filled with steaming tomato soup, garnished with fresh herbs, sits on a pristine white marble surface. A spoon rests invitingly in the bowl, and a striped kitchen towel lies neatly beside it. MyFitnessPal Blog

This vibrant soup made in an Instant Pot is proof that simple ingredients can deliver big flavor. Sweet beets, ripe tomatoes, and tender carrots puree into a silky bowl that’s as nourishing as it is beautiful. Fragrant rosemary and garlic round out the flavor for a soup that feels anything but ordinary.

Active time: 20 minutes | Total time: 50 minutes

Pressure Cooker Beet and Tomato Soup

Ingredients

  • 1 tsp olive oil
  • 1 yellow onion, diced
  • 1/2 tsp dried rosemary
  • 2 whole cloves
  • 4 garlic cloves, minced
  • 4 ripe tomatoes, halved
  • 2 medium beets, peeled and diced into 1 inch cubes
  • 2 large carrots, peeled and cut into 1 inch pieces
  • 2 1/2 cups water
  • 1/2 tsp salt
  • 1/2 tsp black pepper

Directions

Heat the olive oil in a pressure cooker over medium heat. Add the onion, rosemary, cloves and sauté for 3–5 minutes, or until the onion is softened and translucent. Add the garlic and cook for 30 seconds, until fragrant.

Add the tomatoes, beet, carrot, and water. Lock the lid and cook at high pressure for 15–20 minutes. Allow the mixture to cool slightly, then puree and strain into a medium pot.

Add the salt and black pepper and simmer for 5 minutes. Serve hot.

Serves: 4 | Serving Size: About 1 cup

Nutrition (per serving): Calories: 77; Total Fat: 2g; Saturated Fat: 0g; Monounsaturated Fat: 1g; Polyunsaturated Fat: 0g; Cholesterol: 0mg; Sodium: 354mg; Carbohydrate: 15g; Dietary Fiber: 4g; Sugar: 9g; Protein: 2g

Nutrition Bonus: Calcium: 4%; Iron: 5%; Potassium: 585mg; Vitamin A: 401%; Vitamin C: 39%

Originally published: October 26, 2018; Updated May 2026

The post Pressure Cooker Beet and Tomato Soup appeared first on MyFitnessPal Blog.

  •  

Crispy Chicken Tortilla Pizzas

Easy Five-Ingredient Tortilla Pizzas

Low-carb, whole-wheat tortillas create a crisp, thin-crust base for these flavorful chicken pizzas. This recipe makes two pizzas—just enough to fit on a standard sheet pan—but can easily be doubled if you’re feeding a crowd or want leftovers.

Active time: 5 minutes | Total time: 15 minutes

Crispy Chicken Tortilla Pizzas

Ingredients

  • 2 8-inch (20cm) whole-wheat, high-fiber tortillas
  • 1/2 cup (128g) low-sodium marinara sauce
  • 1/8 tsp crushed red pepper
  • 1 cup (140g) cooked chicken breast, shredded (rotisserie chicken works great here)
  • 2 cups (50g) fresh spinach, coarsely chopped
  • 2/3 cup (75g) part-skim mozzarella, grated

Directions

 Preheat the oven to 425°F (220°C). Arrange the tortillas on a sheet pan and bake until lightly browned, 2–4 minutes. Remove the pan from the oven.

Carefully flip the tortillas. Spread 1/4 cup marinara over each tortilla and sprinkle each with crushed red pepper. Top each with ½ cup shredded chicken. Arrange 1 cup spinach on each tortilla and sprinkle 1/3 cup mozzarella over each.

Bake until the cheese is melted and bubbly, about 5–7 minutes.

Serves: 2 | Serving Size: 1 pizza

Nutrition (per serving): Calories: 347; Total Fat: 19g; Saturated Fat: 8g; Monounsaturated Fat: 16g; Polyunsaturated Fat: 3g; Cholesterol: 212mg; Sodium: 768mg; Carbohydrate: 21g; Dietary Fiber: 12g; Sugar: 5g; Protein 33g
Nutrition Bonus: Potassium: 657mg; Iron: 11%; Vitamin A: 203%; Vitamin C: 17%; Calcium: 41%

Originally published June 2020; Updated May 2026

The post Crispy Chicken Tortilla Pizzas appeared first on MyFitnessPal Blog.

  •  

Slow Cooker Chicken and Barley Soup

Slow Cooker Chicken and Barley Soup

Simple is good, especially when you can put all the ingredients for a comforting chicken soup in a slow cooker, shred the chicken and transfer the soup to glass containers — you can even pack some for lunch. Pearled barley is rich in beta-glucans, a type of soluble fiber that may help reduce cholesterol, and barley has been shown to provide satiety and a feeling of fullness (1, 2).

Active time: 20 minutes | Total time: 5 hours, 20 minutes

Slow Cooker Chicken and Barley Soup

Ingredients

  • 4 cups (960g) low-sodium chicken broth
  • 1 large onion, chopped
  • 3 large carrots, chopped
  • 4 celery stalks, chopped
  • 2 garlic cloves, minced
  • ¼ cup (50g) pearled barley, dry
  • 1 tbsp fresh rosemary, finely chopped
  • 1 bay leaf
  • 1/2 tsp black pepper
  • 1 lb (454g) chicken breast, raw
  • ¼ cup (15g) Italian parsley, chopped
  • ½ lemon, juiced

Directions

Place the stock, onion, carrot, celery, garlic, barley, rosemary, bay leaf and black pepper in a large slow cooker, stir to combine. Place the chicken breast on top and cover the pot tightly. Cook on high for 2-3 hours or low for 4-5 hours, or until the chicken is easily shredded and reaches an internal temperature of 165°F.

Uncover, then use tongs to remove the bay leaf and place the chicken on a plate. Let cool slightly, then use two forks to shred the meat. Return the chicken to the pot and add the parsley and juice from ½ a lemon, stir and serve.

Serves: 4 | Serving Size: 1 ½  cup

Nutrition (per serving): Calories: 275; Total Fat: 5g; Saturated Fat: 1g; Monounsaturated Fat: 2g; Polyunsaturated Fat: 1g; Cholesterol: 83mg; Sodium: 203mg; Carbohydrate: 25g; Dietary Fiber: 5g; Sugar: 5g; Protein: 33g

Nutrition Bonus: Calcium: 6%; Iron: 11%; Potassium: 1014mg; Vitamin A: 609%; Vitamin C: 23%

Originally published February 14, 2021; Updated February 2026

The post Slow Cooker Chicken and Barley Soup appeared first on MyFitnessPal Blog.

  •  

Slow Cooker Chicken Tortilla Soup

Do a quick prep in the morning and come home to a ready-to-eat chicken tortilla soup. At only 348 calories with 39 grams of protein and 11 grams of fiber, this soup makes a healthy leftover lunch. 

RD Tip: If you decide to pack this soup for lunch, keep the avocado and chips separate until right before you sit down to eat. Also, adding a splash of hot sauce will dial up the flavor if you enjoy a little heat.

Active Time: 5 minutes | Total Time: 8 hours + 5 minutes

Slow Cooker Chicken Tortilla Soup

Ingredients

  • 1 lb boneless, skinless chicken breast
  • 1/2 tsp salt
  • 1/4 tsp black pepper
  • 4 cups (260g) low-sodium chicken broth
  • 1 15-oz (425g) can low-sodium black beans, rinsed and drained
  • 1 15-oz (425g) jar low-sodium salsa
  • 1/2 avocado, diced, for garnish
  • 12 tortilla chips, crumbled, for garnish

Directions

Season the chicken with salt and black pepper. 

Place the chicken, broth, black beans and salsa in a slow cooker. Cook on low for 8 hours or high for 4 hours. Remove chicken and shred, then return to soup. 

Spoon soup into bowls, top with avocado and tortilla chips and serve immediately.

Serves: 4 | Serving Size: 1/4 recipe, about 2 cups

Nutrition (per serving): Calories: 348; Total Fat: 9g; Saturated Fat: 2g; Monounsaturated Fat: 3g; Polyunsaturated Fat: 2g; Cholesterol: 83mg; Sodium: 670mg; Carbohydrate: 33g; Dietary Fiber: 11g; Sugar: 4g; Protein: 39g

Nutrition Bonus: Calcium: 9%; Iron: 22%; Potassium: 1,269 mg; Vitamin A: 18%; Vitamin C: 40%

Originally published November 2017, Updated May 2026

The post Slow Cooker Chicken Tortilla Soup appeared first on MyFitnessPal Blog.

  •  

Sheet Pan Ginger-Soy Tofu

Crispy, golden tofu might just convert even the most skeptical tofu doubters with this flavor-packed sheet pan ginger-soy tofu dinner. A savory ginger-soy glaze coats every cube before roasting, resulting in a satisfying crunch that pairs beautifully with tender broccoli and hearty edamame. Served over nutty brown rice and finished with a scattering of sesame seeds and green onions, this plant-based powerhouse delivers on both flavor and nutrition.

 Active time: 15 minutes | Total time: 45 minutes

 Sheet Pan Ginger-Soy Tofu

 Ingredients

  • 2 14 oz (396g) blocks extra-firm tofu, drained and pressed for at least 30 minutes (or up to overnight)
  • 3 tbsp reduced-sodium soy sauce
  • 2 tbsp sesame oil
  • 1 tbsp rice vinegar
  • 1 tbsp fresh ginger, peeled and finely grated
  • 2 garlic cloves, minced
  • 1 tbsp honey or maple syrup
  • 1 tsp Sriracha (optional)
  • 4 cups (285g) broccoli florets
  • 1 cup (155g) shelled edamame
  • 1 tbsp sesame seeds
  • 2 medium green onions, thinly sliced
  • 2 cups (400g) cooked brown rice, for serving

Directions

To press the tofu: Wrap each block in a clean kitchen towel or several layers of paper towels and place on a flat surface. Set a heavy pan or cutting board on top and let stand for at least 30 minutes to remove excess moisture. For best results, press overnight in the refrigerator.  

Preheat the oven to 425°F (220°C). Line a large rimmed baking sheet with foil and coat generously with cooking spray. Cut the tofu into 1-inch cubes and pat thoroughly dry with paper towels — the drier the tofu, the crispier it will become in the oven.

In a small bowl, whisk together the soy sauce, sesame oil, rice vinegar, ginger, garlic, honey, and Sriracha, if using. Pour half of the sauce into a large bowl, add the tofu, and toss gently to coat. Spread the tofu in a single layer on the prepared baking sheet and roast for 15 minutes. Flip the tofu and push it to one side of the pan. Add the broccoli and edamame to the other side and drizzle with the remaining sauce, tossing to coat. Spread everything in a single layer and return to the oven for 12–15 minutes, or until the tofu is golden and crispy and the broccoli is tender and lightly charred.

Divide the brown rice among four bowls. Top with the tofu, broccoli, and edamame. Garnish with sesame seeds and green onions and serve immediately.

Serves: 4 | Serving Size: about 1 cup tofu and vegetables, 1/2 cup brown rice

Nutrition (per serving): Calories: 493; Total Fat: 21g; Saturated Fat: 3g; Monounsaturated Fat: 6g; Polyunsaturated Fat: 10g; Cholesterol: 0mg; Sodium: 402mg; Carbohydrate: 47g; Dietary Fiber: 8g; Sugar: 9g; Protein: 30g

Nutrition Bonus: Calcium: 20%; Iron: 31%; Potassium: 636mg; Vitamin A: 13%; Vitamin C: 10%

Originally published May 2026

The post Sheet Pan Ginger-Soy Tofu appeared first on MyFitnessPal Blog.

  •  

Slow Cooker Peanut Chicken With Broccoli

Slow Cooker Peanut Chicken With Broccoli

Stir a few ingredients together in your slow cooker, add chicken breasts and you’ve got a chicken dinner with a velvety Thai inspired peanut sauce ready when you are. We add crisp-tender broccoli, but green beans, carrots, baby corn or a long list of other veggies are welcome. The trick is to briefly microwave or steam the veggies and stir them through the sauce right before serving so they’re not overcooked. Serve over brown rice or quinoa.

Active time: 10 minutes | Total time: 4 hours, 10 minutes (low) or 2 hours, 10 minutes (high)

Slow Cooker Peanut Chicken With Broccoli

Ingredients

  • 1/2 cup light coconut milk
  • 1/4 cup smooth peanut butter
  • 2 tbsp rice vinegar
  • 1 tbsp brown sugar
  • 1 tbsp low-sodium soy sauce
  • 2 tsp Thai red curry paste
  • 1 tsp lemongrass paste
  • 1 small yellow onion, diced
  • 3 cloves garlic, minced
  • 1 lb boneless, skinless chicken breasts
  • 4 cups broccoli florets
  • 1 tsp cornstarch

Directions

In a 6-quart slow cooker, whisk together the coconut milk, peanut butter, rice vinegar, brown sugar, soy sauce, red curry paste, and lemongrass paste until smooth. Stir in the onion and garlic. Add the chicken and stir to coat.

Cover and cook on low for 3½–4 hours or on high for 2–2½ hours, until the chicken reaches an internal temperature of 165°F (74°C).

Transfer the chicken to a cutting board and slice or shred into bite-size pieces. Pour the cooking liquid into a small saucepan. In a small bowl, whisk together the cornstarch and 1 tbsp cold water until smooth, then stir into the saucepan. Bring to a simmer over medium heat, stirring frequently, until the sauce has thickened, about 2 minutes. Remove from heat.

While the sauce thickens, combine the broccoli with 2 tbsp water in a microwave-safe bowl and microwave on high for 2–3 minutes, or until crisp-tender. Alternatively, steam the broccoli on the stovetop for about 3 minutes. Drain.

Arrange the chicken and broccoli on a serving platter or divide between bowls. Pour the sauce over the top and serve immediately.

Serves: 4 | Serving Size: 4 oz. chicken, 1 cup broccoli, 1/4 cup sauce

Nutrition (per serving): Calories: 320; Total Fat: 14g; Saturated Fat: 4g; Monounsaturated Fat: 5g; Polyunsaturated Fat: 3g; Cholesterol: 83mg; Sodium: 369mg; Carbohydrate: 17g; Dietary Fiber: 3g; Sugar: 7g; Protein: 32g

Nutrition Bonus: Calcium: 7%; Iron: 8%; Potassium: 809mg; Vitamin A: 1%; Vitamin C: 140%

Originally published: January 17, 2020; Updated May 2026

The post Slow Cooker Peanut Chicken With Broccoli appeared first on MyFitnessPal Blog.

  •  
❌