Instant oatmeal packets are a godsend for busy mornings, but have you considered crafting your own instant oatmeal jars? By purchasing oatmeal, dried fruit and nuts in bulk, you can make your own version of instant oatmeal, and save money at the same time. Use small mason jars to portion out your meal, or some bags will also do the trick.
Active time: 5 minutes | Total time: 5 minutes
Cranberry Almond Oatmeal Jars
Ingredients
1/2 cup (40 grams) uncooked quick oats
1/8 tsp salt
1/8 tsp cinnamon
1 tbsp dried cranberries (or dried fruit of your choice)
1 tbsp slivered almonds (or nuts of your choice)
1 cup water
Directions
To make the oatmeal jar, layer the ingredients in the following order: oats, salt, cinnamon, cranberries, and almond slivers. Make as many jars as desired and store in a dry area. If you do not have mason jars, oatmeal packets can also be made using zip-lock bags. Label with the date to help track freshness.
To cook the oatmeal with boiling water, bring 1 cup water to a rolling boil. Pour the water into the oatmeal jar and stir. Let the oatmeal stand for 4–5 minutes to soften, then stir and enjoy.
To cook the oatmeal in the microwave, pour the oatmeal into a microwave-safe container large enough to allow bubbling without spilling, then add 1 cup water. Microwave on power level 7 for 2 minutes.
Omega-3-rich salmon gets a creamy miso topping with crunchy panko bread crumbs in this easy one-pan meal. Radishes and baby bok choy cook in the same amount of time and are a unique combo, just when you were getting tired of the usual sheet pan veggies!
This is a great option for a quick, low-maintenance dinner, and it’s packed with anti-inflammatory properties from the salmon (1).
Active time: 10 minutes | Total time: 25 minutes
Sheet Pan Miso Salmon With Baby Bok Choy
Ingredients
Cooking s
Omega-3-rich salmon gets a creamy miso topping with crunchy panko bread crumbs in this easy one-pan meal. Radishes and baby bok choy cook in the same amount of time and are a unique combo, just when you were getting tired of the usual sheet pan veggies!
This is a great option for a quick, low-maintenance dinner, and it’s packed with anti-inflammatory properties from the salmon (1).
Active time: 10 minutes | Total time: 25 minutes
Sheet Pan Miso Salmon With Baby Bok Choy
Ingredients
Cooking spray
4 (5-oz./142g) salmon fillets, skin-on
3 tbsp mayonnaise
1 tbsp white miso paste
1 tsp lemon zest, finely grated
1 tsp lemon juice
1/2 cup (42g) whole-wheat panko crumbs
4 small baby bok choy, halved lengthwise (quartered if larger)
1 tbsp olive oil
1/2 tsp salt
1/4 tsp black pepper
Directions
Preheat the oven to 450°F (232°C). Line a rimmed baking sheet with foil and coat generously with cooking spray. Using tweezers or needle-nose pliers, remove any pin bones from the salmon fillets. Arrange the fillets skin-side down in the center of the prepared baking sheet.
In a small bowl, stir together the mayonnaise, miso paste, lemon zest, and lemon juice until smooth. Spread the mixture evenly over the top of each fillet, then gently press the panko crumbs onto the surface so they adhere.
In a medium bowl, toss the bok choy with the oil until evenly coated. Scatter the vegetables around the salmon and season with the salt and pepper. Roast, rotating the pan once halfway through, until the salmon is cooked through to an internal temperature of 145°F, about 12–15 minutes.
To serve, slide a spatula gently between the flesh and skin of each fillet — the skin should release easily from the foil. Transfer to plates, discarding the skin, and serve immediately.
Serves: 4 | Serving Size: 1 salmon fillet, 2 bok choy halves
Set yourself up for healthy eating throughout the week with this easy make-ahead breakfast. Once baked, store in the refrigerator and simply reheat a piece each morning — 60-90 seconds in the microwave should do it. Then, top with fresh berries and enjoy a hearty, lightly sweetened, whole-grain breakfast.
Active time: 10 minutes Total time: 55 minutes
Vegan Cinnamon-Apple Baked Oatmeal
Ingredients
2 1/2 cups old-fashioned oats
2 tsp ground cinnamon
1 tsp baking powder
1/2 tsp salt
2 1/4 cups u
Set yourself up for healthy eating throughout the week with this easy make-ahead breakfast. Once baked, store in the refrigerator and simply reheat a piece each morning — 60-90 seconds in the microwave should do it. Then, top with fresh berries and enjoy a hearty, lightly sweetened, whole-grain breakfast.
Active time: 10 minutes Total time: 55 minutes
Vegan Cinnamon-Apple Baked Oatmeal
Ingredients
2 1/2 cups old-fashioned oats
2 tsp ground cinnamon
1 tsp baking powder
1/2 tsp salt
2 1/4 cups unsweetened soy milk
2 sweet apples, grated and unpeeled (such as Honeycrisp)
2 tbsp maple syrup
1 1/2 tsp vanilla extract
1/2 cup walnuts, chopped
2 cups strawberries, sliced
1 cup raspberries
1 cup blackberries
Directions
Preheat the oven to 375°F (190°C) and lightly coat an 11-by-7-inch glass baking dish with cooking spray.
In a large bowl, combine the oats, cinnamon, baking powder, and salt. Add the soy milk, grated apple, maple syrup, and vanilla extract, and stir until well mixed. Pour the mixture into the prepared baking dish and spread it evenly. Sprinkle the chopped walnuts over the top. Bake for about 35 minutes, or until the oatmeal is set and lightly golden.
Meanwhile, in a small bowl, gently combine the strawberries, raspberries, and blackberries. Store in an airtight container.
Let stand for 5–10 minutes before cutting into six pieces. Let cool completely, then store each piece in an airtight container for easy transport.
To reheat, place in the microwave for 60-90 seconds, or until hot. Top cold berry mixture and enjoy.
Serves: 6 | Serving Size: 1 oatmeal piece and 2/3 cup berries
Reminiscent of creamy beef stroganoff without the beef, this Instant Pot recipe uses whole-grain pasta, mushrooms and herb and garlic spreadable cheese to get dinner on the table fast. Use gourmet mushrooms instead of cremini if you’re feeling fancy.
Active time: 15 minutes | Total time: 25 minutes
Pressure Cooker Creamy Mushroom and Kale Pasta
Ingredients
1 tbsp olive oil
4 cups (280g) cremini mushrooms, cut into quarters
1 yellow onion, diced
1/2 tsp salt
3 medium garlic cloves, thinly sliced
2 tsp fresh thyme, roughly chopped
8 oz. (227g) whole-wheat rotini
1 1/2 cups (355ml) low-sodium vegetable broth
1 pinch crushed red pepper
4 cups (100g) baby kale
4 tbsp (58g) herb and garlic spreadable cheese
Directions
Select the sauté function on the Instant Pot and adjust to high heat. Add the olive oil, mushrooms, onions, and salt and cook, stirring frequently, for about 5 minutes, or until the mushrooms begin to release their juices. Add the garlic and thyme and cook for 30 seconds, or until fragrant.
Add 1 cup of water and simmer for 1 minute, scraping up any browned bits from the bottom of the pot. Press cancel.
Add the pasta, vegetable broth, and crushed red pepper and stir to combine. Lock the lid and set the valve to sealing. Cook on high pressure for 3 minutes.
Carefully quick-release the pressure, loosely draping a towel over the vent to catch any starchy liquid. Remove the lid and stir in the kale and spreadable cheese until combined. Cover and let stand for 5 minutes to allow the pasta to finish cooking and absorb the liquid.
A victory for freedom of eats.
The ruling Liberal Democratic Party has been hard at work drafting a bill to criminalize desecration of the Japanese flag. It’s apparently a pressing matter, even though I’ve never seen anyone do anything bad to a flag before. In fact, I rarely see the flag used much at all, good or bad. But it’s perhaps in anticipation of continuing protests to the current administration’s efforts to roll back the pacifist elements of the constitution that they feel this is a pr
The ruling Liberal Democratic Party has been hard at work drafting a bill to criminalize desecration of the Japanese flag. It’s apparently a pressing matter, even though I’ve never seen anyone do anything bad to a flag before. In fact, I rarely see the flag used much at all, good or bad. But it’s perhaps in anticipation of continuing protests to the current administration’s efforts to roll back the pacifist elements of the constitution that they feel this is a priority.
There has been a lot of discussion about the specific details of this law as it rubs up against people’s freedom of expression. One major point is what exactly constitutes the national flag of Japan. Especially since it’s just a red circle on a white background, I could drop some spaghetti sauce on my shirt and end up wearing the flag. So, how is it legally different from a real flag?
According to the latest revision of the bill, the flag is defined as generally made of cloth or paper, primarily displayed on poles as a sign or decoration, and usable in real society. This means the Japanese flags in the virtual world are fair game, which is great news for my upcoming smartphone game Flag Blaster 3000.
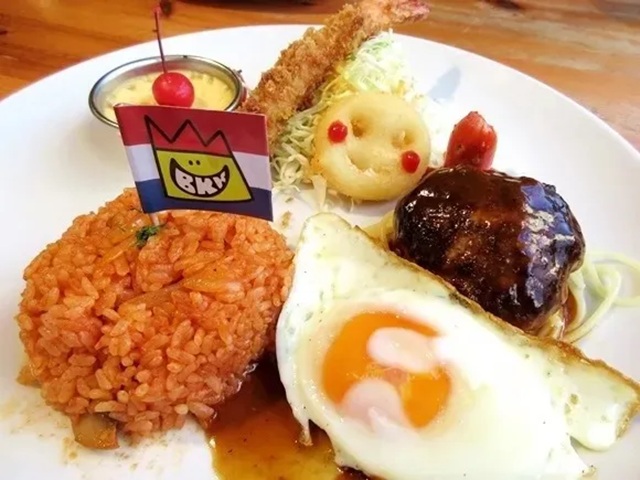
But where does that leave those little toothpick flags that restaurants in Japan stick in the potato salad or rice of kids’ meals? They’re made of paper, displayed as a decoration, and used in society.
▼ The countries are usually randomly given out, so there’s only a small chance of getting a Japanese flag a lot of the time.
Since they technically fit the legal definition of a flag, the makers of the bill decided to explicitly exclude kids’ meal flags from the law. This means you wouldn’t have to worry about getting in trouble with the law if you attacked some ketchup rice extra hard and made a mess of your flag. Another exemption involves flags depicted in paintings. That being said, destroying other people’s paintings can land you in a whole other spot of trouble.
Online commenters have been less than happy that this is what the government is choosing to spend its time on when so many other things in the country seems to be getting less and less bearable.
“This is what they’re discussing?” “They can’t seriously be spending time on kids’ meal flags.” “Just ignoring all of our other anxieties.” “Didn’t they recently say they didn’t have time to discuss same-sex marriage or separate surnames?” “I should get a tattoo of the flag. Then no one will hurt me.” “Just copy whatever they do in France and get it done with.” “When I was a kid, I used to carefully save my kids’ meal flag and take it home. I’d usually forget all about it 10 minutes after that.”
The draft bill also includes a provision that freedom of expression should be considered when pressing charges. According to the wording,artistic expression, such as live-action films, using real national flags as props would be exempt if considered socially acceptable.
That last part about being “considered socially acceptable” is still a matter of contention in the bill, since it is greatly open to interpretation. I think we can all agree that Godzilla torching the flag with its atomic breath is completely acceptable because that big lug just doesn’t know any better. But if King Kong hurls a colossal turd at one, the issue becomes much less black and white.
These tostadas have it all — crunchy baked tortillas, creamy black beans, plump lime-marinated shrimp and radishes and a crisp slaw. Even better, it’s ready in less than 30 minutes!
If you don’t have no salt added canned beans on hand, be sure to rinse them well. This will significantly reduce the sodium the beans are canned with (1)!
Active time: 15 minutes | Total time: 25 minutes
Shrimp and Radish Tostadas
Ingredients
8 (6-in/15cm) corn tortillas
1/2 tsp salt, divided
1 lb (454g) shrimp, pe
These tostadas have it all — crunchy baked tortillas, creamy black beans, plump lime-marinated shrimp and radishes and a crisp slaw. Even better, it’s ready in less than 30 minutes!
If you don’t have no salt added canned beans on hand, be sure to rinse them well. This will significantly reduce the sodium the beans are canned with (1)!
Active time: 15 minutes | Total time: 25 minutes
Shrimp and Radish Tostadas
Ingredients
8 (6-in/15cm) corn tortillas
1/2 tsp salt, divided
1 lb (454g) shrimp, peeled and deveined
1/4 cup (50g) lime juice
5 radishes, thinly sliced
2 green onions, thinly sliced
1 tsp chili powder
1 (15 oz/425g) no salt added canned black beans, rinsed and drained
2 cups (115g) bagged coleslaw
1/3 cup (82g) plain Greek yogurt
Directions
Preheat the oven to 400°F (204°C). Mist the tortillas on both sides with olive oil cooking spray and arrange in a single layer on a baking sheet. Bake until golden brown on one side, 5 minutes. Flip tortillas and cook on the second side until golden brown and crisp, about 3 minutes. Remove from the oven, sprinkle with a pinch of salt, and set aside.
Place the shrimp in a medium saucepan and cover with cold water. Bring to a boil, reduce heat to low, and simmer until the shrimp curl and are cooked through, 1–3 minutes, depending on the size of the shrimp. Drain well. In a large bowl, combine the shrimp with the remaining salt, lime juice, radishes, green onions and chili powder. Set aside.
Warm up the beans and 1/4 cup (59ml) water in a small saucepan over medium heat until hot, about 4 minutes. Mash with a fork until half of the beans are mashed.
Spread the beans on the tostadas. Top with the shrimp mixture. Put the slaw mix and dollops of the yogurt on top of each tostada and serve immediately.
If you love fried rice but not the extra sodium and fat in takeout versions, this recipe is for you. Packed with vegetables and lean protein, it’s a great way to use leftover brown rice. Baking everything on a preheated sheet pan in a hot oven creates crispy bits of rice while streamlining the process. Feel free to switch up the vegetables or use other quick-cooking proteins, like diced chicken breast or tofu, in place of shrimp. A generous amount of fresh ginger adds bold flavor and provides an
If you love fried rice but not the extra sodium and fat in takeout versions, this recipe is for you. Packed with vegetables and lean protein, it’s a great way to use leftover brown rice. Baking everything on a preheated sheet pan in a hot oven creates crispy bits of rice while streamlining the process. Feel free to switch up the vegetables or use other quick-cooking proteins, like diced chicken breast or tofu, in place of shrimp. A generous amount of fresh ginger adds bold flavor and provides antioxidants that may support overall health (1).
Place a large, rimmed baking sheet in the center of the oven and preheat to 450°F (246°C).
In a large bowl, whisk together the oil, black bean garlic sauce, garlic, ginger, and soy sauce. Crumble the rice into the bowl. Add the mushrooms, celery, and carrots, and toss to combine. Carefully spread the mixture onto the preheated baking sheet in an even layer. Bake until the rice begins to brown in the corners of the pan, about 10 minutes.
Add the shrimp and peas to the rice mixture and stir with a spatula to loosen any stuck-on bits. Spread the mixture back into an even layer and continue baking until the shrimp are opaque and cooked through, about 5–6 minutes more (the shrimp should reach an internal temperature of 145°F/63°C).
Meanwhile, scramble the egg in a small nonstick skillet over medium heat until just set. Remove from heat. Stir the cooked egg into the rice mixture along with the green onions before serving.
Use the Instant Pot to produce a hearty, vegetable-packed soup in 30 minutes, start to finish. Cooking the chickpea pasta separately ensures it won’t become mushy in the soup, so it’s worth the extra step. A swirl of fresh pesto adds a pop of color and freshness to this wintery soup.
This soup packs a variety of veggies, perfect to load up on vitamins, minerals and antioxidants during flu and cold season.
Active time: 15 minutes Total time: 30 minutes
Instant Pot Minestrone
Ingredients
1 tbsp
Use the Instant Pot to produce a hearty, vegetable-packed soup in 30 minutes, start to finish. Cooking the chickpea pasta separately ensures it won’t become mushy in the soup, so it’s worth the extra step. A swirl of fresh pesto adds a pop of color and freshness to this wintery soup.
This soup packs a variety of veggies, perfect to load up on vitamins, minerals and antioxidants during flu and cold season.
Active time: 15 minutes Total time: 30 minutes
Instant Pot Minestrone
Ingredients
1 tbsp olive oil
1 medium yellow onion, chopped
1 large carrot, chopped
1 celery stalk, thinly sliced
1/2 cup (45g) chopped fennel bulb
3 garlic cloves, chopped
1/4 cup (60g) dry white wine
4 cups low-sodium vegetable broth
1 1/2 cups (360g) canned diced no-salt added tomatoes with juice
1 (15-oz.) can low-sodium kidney beans, rinsed and drained
1/3 tsp salt
1/4 tsp black pepper
3/4 cup (50g) protein-plus chickpea elbow pasta, cooked according to package instructions
1/4 cup (65g) pesto
Directions
Put the oil in the Instant Pot, select sauté, and adjust to high heat. Add the onion, carrot, celery, and fennel and cook, stirring occasionally, until the vegetables begin to soften, about 4 minutes. Add the garlic and cook until fragrant, about 45 seconds.
Add the wine and simmer, scraping up any browned bits from the bottom of the pot, until nearly evaporated, about 1 minute. Press cancel. Add the broth, tomatoes, and cauliflower. Lock the lid and turn the valve to sealing. Select pressure cook, adjust to high pressure, and set the timer for 5 minutes. When the cook time is complete, turn the valve to venting to quickly release the pressure.
Carefully unlock the lid and stir in the zucchini, beans, salt, and pepper. Select sauté and adjust to medium heat. Cover with a regular pan lid and simmer until the zucchini is just cooked, about 10 minutes. Stir in the pasta.
Ladle into bowls and garnish each serving with 1 tbsp pesto. Cool leftovers and store in an airtight container in the refrigerator for up to 5 days.